Tutorials
How to put an effect on a real site: by pasting it into Webflow, by handing it to an AI, or by wiring the two files yourself. Pick a chapter on the left.
Webflow
Everything a component needs is inside one Webflow Embed. The paste brings the section, its classes and the code.
- Paste the sectionWhat the paste brings, and where it lands.
- Where the code livesThe Embed, the page settings, the site settings.
- The custom attributeOne attribute on your own title, image or section.
- Swap the imagesFind the named div in the Navigator, set your own files.
- Tune with attributesChange a duration or a colour without touching the code.
Paste the section
- On the component page, open the With Webflow tab and click Copy to Webflow.
- In the Designer, open the Navigator and select Body, or the section you want the effect to sit next to.
- Press Cmd + V on a Mac, Ctrl + V on Windows.
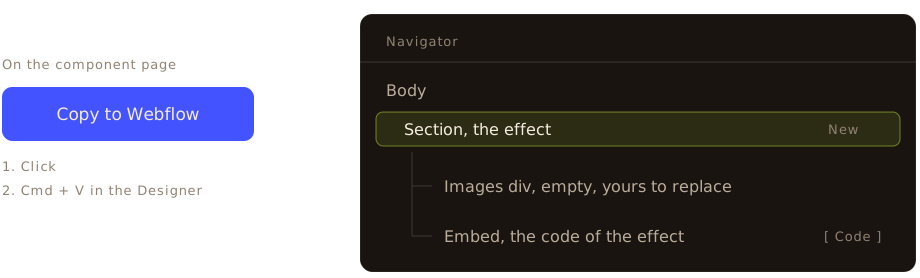
What lands on the canvas: the section of the effect as it is on its page, its Webflow classes so you can restyle it like any other block, its images, and the Embed carrying the code. Swap the texts and the images for your own whenever you want.
The Designer canvas does not run custom code, so the section stays still there; open Preview or the published site to see the effect.
The Embed sits inside the section, so duplicating the section duplicates the effect, and turning it into a Webflow Component makes it reusable.
Where the code lives
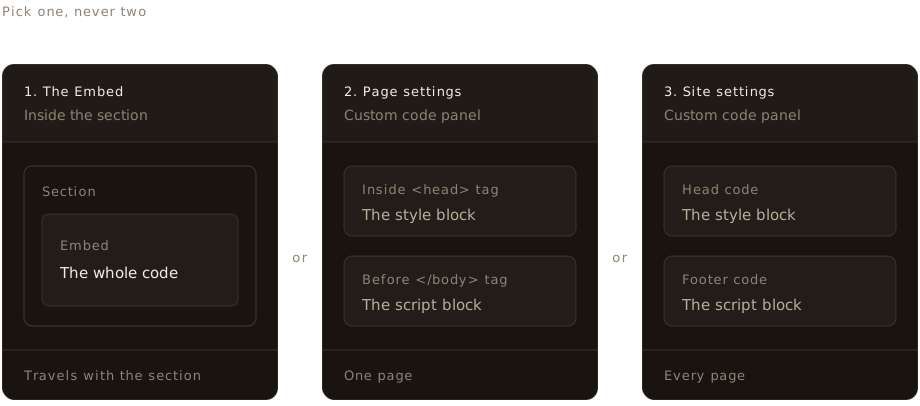
The code can sit in three places. It runs once per page, so it goes in one of them.
| Where | What it covers | How |
|---|---|---|
| The Embed | The section it sits in. The code travels with the section, so duplicating the section duplicates the code. | Added by Copy to Webflow. If you built the section yourself, add an Embed inside it and paste Copy the embed into it. |
| Page custom code | The page it is set on. It is not visible in the Navigator. | Pages panel, the gear beside the page name, then Custom code. The <style> block goes in Inside <head> tag, the <script> block in Before </body> tag. |
| Site custom code Recommended | Every page of the site. | Site settings, then Custom code. The same two blocks, in Head code and Footer code. |
Where to paste the custom CSS
Site code. Site settings, Custom code, Head code. Paste the block from Step 2: Add custom CSS of the component page, with its <style> tags. If you pasted with Copy to Webflow, the Embed already contains it.
Page code. Page settings, Custom code, Inside <head> tag. The same block, on that page only.
Where to paste the custom JS
Site code. Site settings, Custom code, Footer code. Paste the block from Step 3: Add custom JS of the component page, with its <script> tags. If you pasted with Copy to Webflow, the Embed already contains it.
Page code. Page settings, Custom code, Before </body> tag. The same block, on that page only.
The custom attribute
An effect is carried by a custom attribute. When you paste our Webflow component, it is already on the pasted elements.
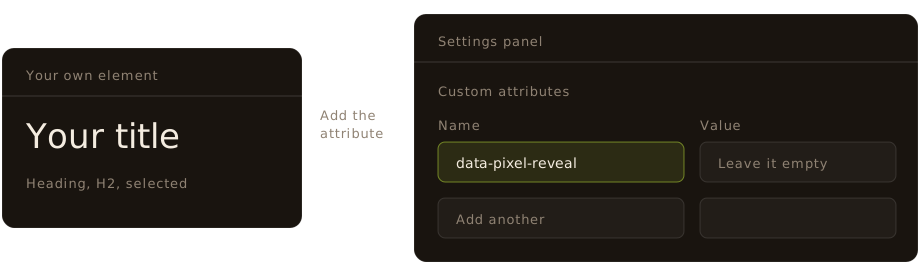
To run the effect on an element of your own, select it, open the Settings panel, and add the attribute under Custom attributes. The last step of the component page lists the attributes of that component, in the same two columns as the table below.
| Custom attribute | What it does |
|---|---|
| data-pixel-reveal | Marks the heading or the paragraph the pixel reveal plays on. Its value is the direction the front travels, and an empty value sweeps to the right. |
| data-pixel-reveal-group | On a box, sweeps every heading and paragraph inside it in one go, which is one attribute instead of one per element. |
| data-pixel-swap | Marks the image box the pixel swap plays on. It takes no value: leave the value field empty. |
| data-pixel-trail | Marks the section the pixel trail draws in. It takes no value: leave the value field empty. |
| data-text-scramble="scroll" | Marks a text the scramble plays on, and its value is the trigger: scroll, hover, or the two together. |
Swap the images
Effects that show pictures, like the pixel trail, paste a named div holding empty Image elements. Find it in the Navigator, select an image, and set your own in the Settings panel, the way you would with any Webflow image.
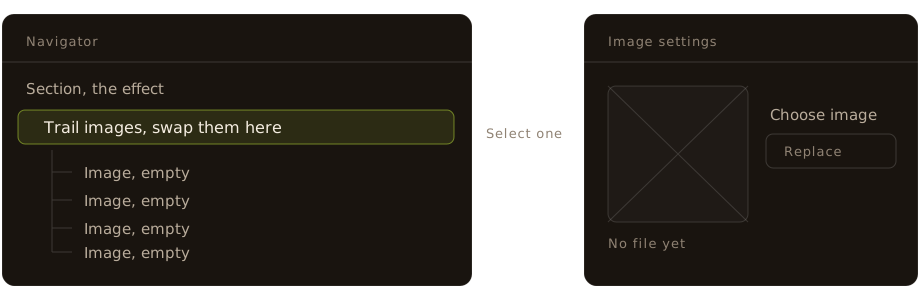
The number of images is free: the effect cycles through the ones it finds, and needs at least one. The div is hidden on the published page: it is a store of pictures, not a gallery.
Tune with attributes
Select the section, open the Settings panel, and add a custom attribute from the table at Step 4 of the component page. That table says what each setting is, and what happens when you lower it or raise it.

An attribute wins over the values written in the code. To change a default for the whole Embed, edit the settings block at its top.
AI
This works with any assistant: a chat window, or a coding agent working in your project. The prompt is the whole handover.
- Copy the promptOne click, and the assistant has the code, the markup and the pitfalls.
- Say what you wantWhich element, which images, what to leave alone.
- Change what you likeUse it as it is, adapt it, or keep only a part.
Copy the prompt
On the component page, click Copy the AI prompt and paste it into your assistant. The prompt carries everything: the complete stylesheet and script, the markup, the library tag when the effect needs one, every setting with its attribute, the API and the events, how the engine works and its pitfalls. There is no file to attach and nothing to fill in.
The pixel effects arrive with stand-in images written into the markup, so the effect runs as soon as it is placed. Your own images take their place.
Say what you want
Under the prompt, in your own words:
- Which element gets the effect, named the way it appears in your project, for example the hero section or the block with the class
gallery. - Which images to use, and where they live in the project.
- What on the page it has to leave alone.
When one of them is missing, the prompt tells the assistant to ask rather than invent it.
Change what you like
The effect works as it is, and nothing stops you from asking for another timing, a different structure or only one part of it. The prompt tells the assistant how the engine works and what breaks, so ask for the change you want rather than forbidding it.
Code
Two files and no build step. The curtain menu and the anchored menu also need GSAP 3 on the page. It runs in the browser only: a script tag in plain HTML, a client-side script in Astro, mount() in a useEffect in React.
- Copy the two filesWhere each of them goes in the page.
- Mark the elementThe data attribute is what the script scans for.
- Mount what arrives laterFor content from a fetch, a router or a CMS.
- Drive an element yourselfmount and destroy.
- Listen to the eventWhat a component reports, and where its name is written.
- Change a settingPer element, or for the whole site.
Copy the two files
Every component ships one CSS file and one JS file. Copy them into your project and reference them: the stylesheet in the head, the script before the closing body tag.
The script has no module wrapper, so a plain tag is enough. Load it once per page even if several elements use the effect.
Mark the element
The component page shows the minimal markup at Step 2 of the Code tab. What matters in it is the data attribute: the script scans the document for elements carrying it once the DOM is ready, and mounts itself on each of them.
| Custom attribute | What it does |
|---|---|
| data-pixel-trail | What the engine of the pixel trail scans for. Every section carrying it is mounted on DOM ready, and a section without it is left alone. |
Mount what arrives later
The scan happens once. For anything you add afterwards, from a fetch, a router or a CMS render, call the component auto() function on the container you just filled. It mounts what is new and leaves what is already mounted alone.
Drive an element yourself
When you want to drive an element rather than let the scan find it, call mount() on that element. It gives you back an instance.
Call destroy() on the instance to remove everything the script added, listeners included, which is what a single page app calls on unmount.
Listen to the event
Components that have something to report emit a custom event on their own element, and put what happened in event.detail. Listen to it to drive your own interface, for example to react when the pixel trail spawns a frame.
The event name is written on the component page, in the last step of the Code tab.
Change a setting
Per element, add the data attribute from the settings table. For the whole site, edit DEFAULTS at the top of the JS file. An attribute always wins over DEFAULTS.
Questions
Short answers about the paste, the limits and the plans.
- Nothing moves on the canvasThe Designer never runs custom code.
- Is there room for the codeThe ceiling, and what a component weighs.
- Does it need a paid planThe same condition for all three places.
- Can I paste it in two placesNo: the same code runs twice.
- Can I delete the pasted exampleYes, once your own element is marked.
- Do your images come with itNo. The paste carries empty ones.
- Nothing moves on the canvas. Is the paste broken?
- No. The Designer does not run custom JavaScript, so the effect only plays in Preview or on the published site.
- Is there room for all that code?
- Webflow allows 50 000 characters per Embed and 50 000 per custom code field. Our biggest component is around 26 500 characters, unminified, comments included.
- Does this need a paid plan?
- Embeds and custom code fields both require a Core, Growth, Agency or Freelancer workspace, or an active site plan. The condition is the same for all three places.
- Can I put the code in two places?
- No. The same code in two places runs twice. Pick one place and keep it.
- Can I delete the section that came with the paste?
- Yes, once your own element carries the attribute and the Embed is still on the page. An effect that fills a whole section, like the pixel trail, keeps a section: mark yours before deleting ours.
- Do your images come with the paste?
- No. They are empty Webflow Image elements, waiting for your files.